Create WYSIWYG (What You See Is What You Get) Web Pages
Build your website is easy with PageFocus. We build our website using PageFocus. It is a simple process of designing the web pages using PageFocus
objects and tools, saving the files in Html and uploading to the website.
Follow these steps to create your web pages.
1.
Creating a website folder to keep all the web pages i.e. C:\website. Select the folder under the left Panel document folder
.
Save all the files related to the web pages in this folder. The folder view allows easy access to the files. Just click to open and edit the file in PageFocus.
2.
Design and create your web pages using PageFocus objects and tools. Drag/paste in images, create text, drawings, and add video. PageFocus lets you
customize the page layout. Right click on the workspace and select Layout/Custom, type in the desired width and height for the page. Add/change colors
of text, line/frame and fill. Resize, rotate, group objects together. WYSIWYG. It is vector graphics and will always keep sharp and clear drawings. See the
design of our home page.
3.
Use Link button
to link object to other file/page. In PageFocus Pro, there is an additional General Command menu for entering Hyper Commands
directly. Select the Text or Button object to be linked and click the Link button
to open the Navigation Link dialog box.
Use the Browse button to select the file to link*. Choose Open in the same window or Open in a new window for the linked file to appear in the website.
The default linked text color is navy. To change the linked text color, select Hyperlink Style button in Preference/Options/HTML menu. You can keep the
original colors using button or group objects to link. DO NOT group a linked object with other objects. Ungroup them before you save the file to HTML.
4.
You don't need to know how to work with a HTML Editor. PageFocus provides HTML Code Container object
(in More Object
) for you to enter
HTML codes. See our Order page. The Buy and Upgrade buttons are HTML Code container objects with the HTML codes from Paypal. This object is
displayed in a semi-transparent color. However, it will not be printed and also will not be displayed in runtime or html output. To keep track, you can
enter a label on it using Insert/Edit Text button
in the Left Panel Tool Bar. Select the HTML Code container object and drag a rectangle object to open
the Enter HTML Code for the HTML Container. Enter the HTML codes and select OK. For our Buy and Upgrade buttons, we just paste in the codes from
Paypal.
5.
Select File/Properties to open File Properties dialog box. Enter "File Title" "Keywords" and "Description". These fields' text will be written as title element,
meta keywords and meta description into the heading when converted to HTML. Title will be displayed when page opened in a browser. Title, Keywords
and Description are not visible (not displayed in browsers), but are searchable by search engines (like Google, Yahoo, etc.). They are useful for Search
Engine Optimization. You can use "source code mode" to see the file title, keywords and description in HTML editors or browser. Search the web to learn
how to create words or phrases to use to achieve optimal search results.
6.
Save the file using lower case letters only. It will be added to the document folder. Select Preference/Options/HTML to add the "Quick-Save to HTML
button"
to the Short Cut Tool Bar
. You only need to do this once. Just click the Quick-Save button, your page will be saved in Html and
opened in your browser for a quick review. When all files are ready, do a "Bulk" conversion by selecting the website folder in the document folder and use
Shift key +
or use right drop_down menu and select Bulk Processing/Convert to HTML to save all files in the folder to HTML. You must do the Bulk
Processing even if you have only one page/file or you have made changes to only one file in the folder.
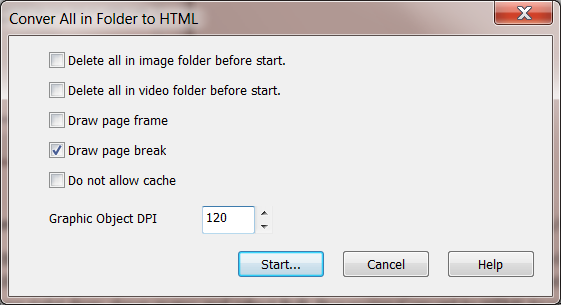
To avoid clutter in the "images" and "videos" folders to be created under the target html folder, check both "Delete...before start". Or delete the html file
folder before starting bulk processing. The bulk processing will create the html folder with all the ready-to-upload html files. If check "Do not allow
Cache", the converted html file will have a tag that instruct the browser not to cache the content of the file. Allowing "Cache" speeds up the
download of the html file but may caused the browser to display older cached files even when these files has been updated in the web site.
After this "Bulk" conversion, all the HTML files will be saved under the html folder (including the linked image or video files). These files are ready for
uploading to your website. To update your web pages, you need to do the Bulk Convert to create the Html folder for uploading even if you just make
changes to one of the web pages. Use your browser to review these web pages. You can use Firefox Fireftp to upload the HTML folder files.
Notes:
1.
Make sure that the referenced/linked file names are all in lower case letters. UNIX web servers are "case" sensitive You must use "the right case" in
referring a file. On Windows server system, it is case insensitive. To make sure that the links can be found in both UNIX and Windows servers, use lower
case letters for all file names.
2.
DO NOT group a linked object with other objects. Ungroup them before you save the file to HTML.
3.
Some group image objects may not convert to HTML properly. Ungroup them before you save the file in HTML.
4.
If you have problem converting an image to HTML, use Alt+PrtScn keys to copy the screen and use Crop to crop the image and paste it back to replace
the image before converting to HTML.


Home > webpage

©
